

24-hour national service hotline
Please contact us for further information
contact>>date:2017-08-15 16:32


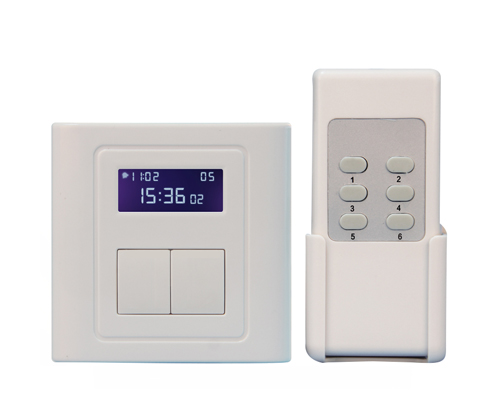
Two buttons to control two loads respectively;
Hidden keypad panel for timer settings;
Delay-off time up to 30 minutes which can be set accurately to a second;
Remote control distance up to 15m;
LCD display showing the current time and the current status of the switch;
Good for all kinds of loads (Resistive inductive and capacitive);
ABS-V0 flame resistance material and Classical 86 series design and high quality build.

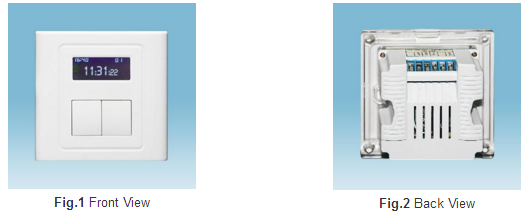
As shown in Fig. 1 the wall mount unit of BRT-606 timer switch has an LCD display and three On/Off buttons in the front. The LCD display shows the current time and the current status of the switch. The On/Off buttons are used for turning on or turning off three loads respectively.
For each On/Off button when the On/Off button is pressed The display shows On and the load will be turned on immediately; and When the On/Off button is presses again the display will show Off and If there is no delay-off time being set the load will be turned off immediately; or If there is delay-off time being set the load will be turned off only after the preset delay off time runs out. Meanwhile the display will show a “bell” sign. Press the On/Off button will cancel the delay off operation and turn off the load immediately.

Fig.3 Hidden 9 Keypad Panel
As shown in Fig. 3 the front plate can be flipped down from the top edge. A 9 keypad panel hidden behind the front plate is used for setting up the timer. Please refer to “BRT-606 Timer Switch Setup” for details

Fig.4 Remote Control Set
Fig. 4 shows the remote control set. Each of the buttons can be used as an on/off button. Although there are 6 buttons on the remote only three buttons are needed to control one BRT-604 wall mount unit. The remote set can be set to control up to two BRT-606 wall mount units. Please refer to “BRT-606 Timer Switch Setup” for details.

Hot wire (ACL): Coming from the power line with 220V;
Neutral wire (ACN): Usually coming with the hot wire;
Load wire: Going to the load.

Fig.5 Wiring Diagram of Wall Mount Unit
Warning: Please make sure power is turned off before starting installation!
Fig. 5 shows the wiring diagram and Fig. 6 shows the step-by-step installation instructions. There are three easy steps:
Step one: Use a screwdriver to pry off the front plate in position A;
Step two: Wiring according to the diagram and the labelled ports of the switch; and
Step three: Install screws and front plate.

Fig.6 Installation Guide of Wall Mount Unit
1.Following the wiring diagram and Installation Guide to set up the wall mount unit and power it with 220 voltages.
2.Flip down the front plate from the top edge.
3.Set up Time and Date: Press the SET button the displayed hours will flash and then press – or + to adjust the hours. Press the SET button again the displayed minutes will flash and then press – or + to adjust the minutes. Press the SET button again the displayed date will flash and then press – or + to adjust the date. Finally press the SET button to finish and the settings are saved.
4.Set up Delay off Time: The delay-off time of the two loads can be set separately. Setting up the first load: The longest delay off time is 30 minutes. Press the Ⅰ button to set the minutes and then press button ◁ or ▷to adjust the minutes. Press the Ⅰbutton again to set the seconds and then press button ◁ or ▷ to adjust the seconds. Finally press and hold the Ⅰbutton to save the settings or the settings will be saved automatically if there is no keypad operation for 15 seconds.
Setting up the second load: Use theⅡbutton to set up the second load in the same way as setting up the first load.
Once the settings are finished flip up and close the front plate. The delay off time can be deleted following Step 2 above and Step 5 below.
5.Delete the Delay off Time setting: Press the Ⅰ (orⅢ) button to set the minutes to 00 using – or + and press the Ⅰ (orⅢ) button again to set the seconds to 00 using – or +. The switch will just have a basic ON/OFF function.
At this point the wall mount unit is ready to control the loads. In order to control the loads remotely using a remote set the remote set needs to be synchronized with the wall mount unit.
6.Install one 12V 23A battery into the remote set.
7.Synchronize the wall mount unit with the remote: Flip down the front plate from the top edge. Press and holdⅠbutton for 2 seconds until the display shows  . Then press one of the 6 buttons on the remote until
 disappears. This button is now set up to control the first load specifically. The synchronization process can last up to 20 seconds. Another remote button can be synchronized to control the second load by usingⅡbutton.
BRT-606 timer switch kit can be used for automatically turning off all kinds of loads such as fans lights appliances or other kinds of electrical equipment. They are perfect for saving energy and bringing convenience and safety to our daily life and work. The remote set is especially handy.
The elegant design of BRT-606 timer switch makes it suitable for wide applications at various locations such as homes schools laboratories hospitals offices etc. especially for luxurious hotels and high-grade villas.