

24-hour national service hotline
Please contact us for further information
contact>>date:2017-08-18 11:16


Auto recycling for up to three recycling timing periods with multiple duty cycles;
Manually triggered recycling with up to five duties cycles;
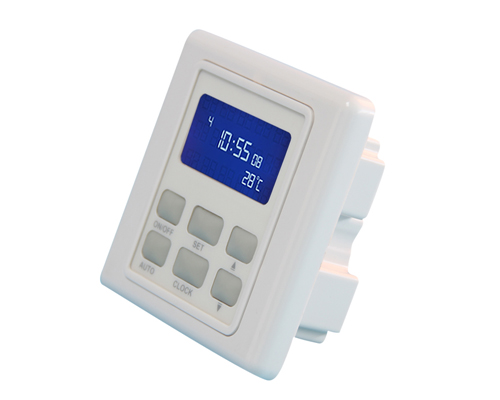
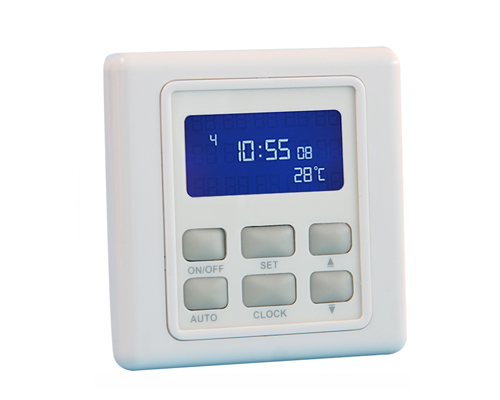
LCD display showing current clock time recycling timing period # and duty cycle periods;
User friendly front panel key pads for easy manual operation or automatic timing settings;
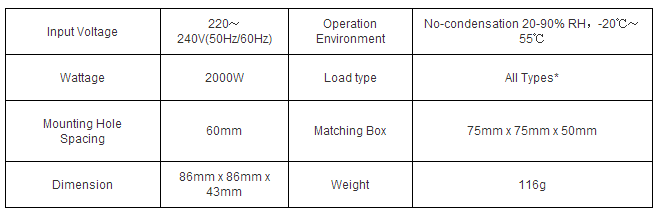
Load up to 2000W;
ABS-V0 flame resistance material; and
Classical 86 series design and high quality build.

The 6 buttons are used to turn on/off the load and set clock time and timing settings.
 :
:
 :
:
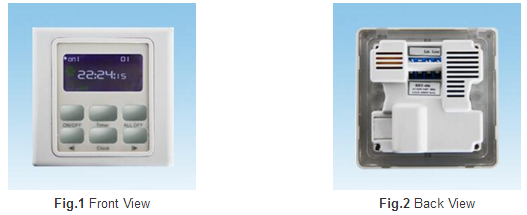
BRT-406 recycling timer switch only requires hot wire for installation:
Hot wire (ACL): Coming from the power line with 220V;
Neutral wire (ACN): Usually coming with the hot wire; and
Load wire: Going to the load.

Fig.4 BRT-406 wiring diagram
Warning: Please make sure power is turned off before starting installation!
Fig. 4 shows the wiring diagram and Fig. 5 shows the step-by-step installation instructions. There are three easy steps:
Step one: Use a screwdriver to pry off the front plate in position A;
Step two: Wiring according to the diagram and the labelled ports of the switch; and
Step three: Install screws and front plate.

Fig.5 BRT-405 installation guide
1.Set up the clock:
1.1 Press the "Clock" button and hold for 3 seconds to enter the clock setup mode the hour display starts to flash; press "" or "" to adjust the hours (holding down "" or "" will adjust the hours quickly);
1.2 Press the "ALLOFF" button again the minute display starts to flash; press "" or "" to adjust the minutes (holding down "" or "" will adjust the minutes quickly); and
1.3 Press and hold the "Clock" button until clock display stops flashing. The clock settings are saved.
(Note: If there is no button operation for 15 seconds the clock settings will be automatically saved)
2.Set up timing period and duty cycles for auto recycling:
BRT-406 can automatically start recycling at preset time. Up to three recycling timing periods can be set up. Within each timing period up to five different duty cycle periods can be set.
Timing period:
2.1 Set up the On time for timing period: Press and hold the "Timer" button for 3 seconds until the hour display starts to flash to enter timing period setup mode. Press "" or "" to adjust the hours (holding down "" or "" will adjust the hours quickly). Press the "ALLOFF" button the minute display starts to flash; press "" or "" to adjust the minutes (holding down "" or "" will adjust the minutes quickly); and
2.2 Set up the Off time for timing period: Once the On time for a timing period is set up press the "ALLOFF" button to set the Off time of the timing period. The hour display starts to flash and the right lower corner of the display shows “CL”. Press "" or "" to adjust the hours (holding down "" or "" will adjust the hours quickly). Press the "ALLOFF" button the minute display starts to flash; press "" or "" to adjust the minutes (holding down "" or "" will adjust the minutes quickly);
Once the timing period is set up proceed to set up the duty cycles. The longest available cycle time is 90 minutes and the shortest available cycle time is 5 seconds.
Duty cycles:
2.3 Press the "Timer" button to set the first On cycle time of the timing period. The minute display starts to flash and the left upper corner of the display shows “on1”. Press "" or "" to adjust the minutes (holding down "" or "" will adjust the minutes quickly). Press the "ALLOFF" button the second display starts to flash; press "" or "" to adjust the seconds (holding down "" or "" will adjust the seconds quickly); and
2.4 Once the first On cycle time for a timing period is set up press the "ALLOFF" button to set the first Off cycle time of the timing period. The minute display starts to flash and the left upper corner of the display shows “off1”. Press "" or "" to adjust the minutes (holding down "" or "" will adjust the minutes quickly). Press the "ALLOFF" button the second display starts to flash; press "" or "" to adjust the seconds (holding down "" or "" will adjust the seconds quickly);
Up to five different On cycles and 5 different Off cycles can be set up for each timing period in sequence. Repeat 2.3 and 2.4 to set up more cycles as desired.
Once the first timing period and its duty cycles are set up proceed to set up the On/Off time and On/Off cycles for the second timing period.
Once all the timing periods and their duty cycles are set up press and hold the "Timer" button until clock display stops flashing. The settings are saved. If there is no button operation for 15 seconds the settings will be automatically saved as well.
3.Manually triggered recycling:
BRT-406 can also start recycling anytime by pressing the “On” button. The duty cycle periods need to be set first by the steps as follows:
3.1 Right after setting up the clock time in step 1.2 press “Clock” button to enter manual recycling setup mode;
3.2 Follow step 2.3 and step 2.4 to set duty cycle periods as desired. Up to five different On cycles and 5 different Off cycles can be set; and
3.3 Once the duty cycles are set up press and hold the "Timer" button until clock display stops flashing. The settings are saved. If there is no button operation for 15 seconds the settings will be automatically saved as well.
The recycling process can be stopped anytime by pressing the “Off” button.
4. Delete settings
All the saved settings can be deleted by changing the settings to “--:--” by following the steps above.